SlideShare a Scribd company logo
1 of 16
By Amy Spears
http://www.toomanycraftstoolittletime.blogspot.com
 A great gift idea:
 Wedding
 Bridal shower
 Housewarming
 Birthday
 Etc
 A great way to gift towels from a registry in a
cute and exciting way!
 4 bath towels
 4 hand towels
 4 washcloths
 1 spool of ribbon 2”
 1 spool of ribbon 1”
 12-24 fake flowers
 1 wooden dowel
 1 pack of safety pins
 3 large rubber bands
 1 pack of sewing pins
 Topper for the cake
 Plastic base (I used a dollar tree circular
platter… perfect!)
Note: You can create a
smaller version of the
shower cake with 2
towels. I used 2 grey
and 2 blue in each
towel. All of my
accessories were shades
of purple.
Prepare the bath towels by
folding them in thirds and
laying them on a flat surface.
Lay two towels next to each
other to create a long line.
Overlap one towel over the
other by 2”.
Lay the second two towels over the first two. If
you used different colors, make sure the same
colors are on the same layer. Overlap these
towels (same as the first layer).
Roll the towels tightly from short end to short
end. Secure with a rubber-band and some
safety pins.
Layer the hand towels just like the bath
towels. If you used two different colors of
towels, make sure the other color is on the
outside layer this time. Roll & secure just
like the bath towels.
Layer the washcloths the same way as the other sets
of towels, making sure the outside layer matches
the color of the outside layer of the bath towels.
Roll and secure.
Stack the layers,
with the biggest
(bath towels) on
the bottom and the
smallest
(washcloths) on
the top. Secure
with three or four
safety pins.
Insert a wooden
dowel down the
middle of the
rolled towels and
cut ½” below the
tip of the cake so
that it doesn’t
poke out. This will
support the cake.
This is also a good
time to put the
cake on the plastic
base.
Add the topper to the
top of the cake. Mine
was a crystal branch so
I was able to just stick
it in the cake. You
may have to use safety
pins or sewing pins. I
also added a glass ‘L’
ornament later on for
the first name of the
recipient.
Add ribbons around the center of each layer,
covering the rubber band. You can put the
larger ribbon the bottom and the smaller
ribbon on top of it to create a more dynamic
ribbon. Secure in the back with sewing or
safety pins.
Cut your fake flowers off
the stems and secure
in a cascading pattern
down the cake. Secure
using sewing pins.
Make sure you warn
the recipient about
the pins in the towels!
Do anything necessary to
straighten ribbon, hide
pins, and tuck in edges
to make the cake as
beautiful as possible!
Towel cake tutorial
Towel cake tutorial

More Related Content

Similar to Towel cake tutorial

22 funactivities
22 funactivities22 funactivities
22 funactivitiesendahayuw
 
Kids craft thecrafideas.com
Kids craft thecrafideas.comKids craft thecrafideas.com
Kids craft thecrafideas.comtheCraftIdeas
 
How to make a small fabric christmas tree
How to make a small fabric christmas treeHow to make a small fabric christmas tree
How to make a small fabric christmas treeMisha Jepson
 
Earth day crafts
Earth day craftsEarth day crafts
Earth day craftsMChainani
 
Tv #8 friend assemblage with string
Tv #8 friend assemblage with stringTv #8 friend assemblage with string
Tv #8 friend assemblage with stringLori Krein Studios
 
Kids crafts
Kids craftsKids crafts
Kids craftsPilarin3
 
How to make a home made drum
How to make a home made drumHow to make a home made drum
How to make a home made drumMark Uy
 
Summer fun finalrevisions
Summer fun finalrevisionsSummer fun finalrevisions
Summer fun finalrevisionsApril Decheine
 
Chic Deco from Trash
Chic Deco from TrashChic Deco from Trash
Chic Deco from TrashNancy Poh
 
Spring craft - thecraftideas.com
Spring craft - thecraftideas.comSpring craft - thecraftideas.com
Spring craft - thecraftideas.comtheCraftIdeas
 
Paper Craft Planet Presents Back to Basics with Stampendous: Lesson 9
Paper Craft Planet Presents Back to Basics with Stampendous: Lesson 9Paper Craft Planet Presents Back to Basics with Stampendous: Lesson 9
Paper Craft Planet Presents Back to Basics with Stampendous: Lesson 9GreenMellen Media
 
wrap the box with a ribbon.ppt
wrap the box with a ribbon.pptwrap the box with a ribbon.ppt
wrap the box with a ribbon.pptManoPrince
 
Making business from recycled materials
Making business from recycled materialsMaking business from recycled materials
Making business from recycled materialsRiz Villanueva
 
Fine Arts for the School Age - Programming for Libraries
Fine Arts for the School Age - Programming for LibrariesFine Arts for the School Age - Programming for Libraries
Fine Arts for the School Age - Programming for LibrariesIndiana State Library
 

Similar to Towel cake tutorial (20)

Tv #6 decoupage vase
Tv #6 decoupage vaseTv #6 decoupage vase
Tv #6 decoupage vase
 
Tv #11 solstice assemblage
Tv #11 solstice assemblageTv #11 solstice assemblage
Tv #11 solstice assemblage
 
22 funactivities
22 funactivities22 funactivities
22 funactivities
 
Kids craft thecrafideas.com
Kids craft thecrafideas.comKids craft thecrafideas.com
Kids craft thecrafideas.com
 
How to make a small fabric christmas tree
How to make a small fabric christmas treeHow to make a small fabric christmas tree
How to make a small fabric christmas tree
 
Earth day crafts
Earth day craftsEarth day crafts
Earth day crafts
 
Tv #8 friend assemblage with string
Tv #8 friend assemblage with stringTv #8 friend assemblage with string
Tv #8 friend assemblage with string
 
Kids crafts
Kids craftsKids crafts
Kids crafts
 
COMO RECICLAR EL PERIODICO
COMO RECICLAR EL PERIODICO COMO RECICLAR EL PERIODICO
COMO RECICLAR EL PERIODICO
 
How to make a home made drum
How to make a home made drumHow to make a home made drum
How to make a home made drum
 
Summer fun finalrevisions
Summer fun finalrevisionsSummer fun finalrevisions
Summer fun finalrevisions
 
Chic Deco from Trash
Chic Deco from TrashChic Deco from Trash
Chic Deco from Trash
 
Spring craft - thecraftideas.com
Spring craft - thecraftideas.comSpring craft - thecraftideas.com
Spring craft - thecraftideas.com
 
Tissue box cover
Tissue box coverTissue box cover
Tissue box cover
 
Paper Craft Planet Presents Back to Basics with Stampendous: Lesson 9
Paper Craft Planet Presents Back to Basics with Stampendous: Lesson 9Paper Craft Planet Presents Back to Basics with Stampendous: Lesson 9
Paper Craft Planet Presents Back to Basics with Stampendous: Lesson 9
 
wrap the box with a ribbon.ppt
wrap the box with a ribbon.pptwrap the box with a ribbon.ppt
wrap the box with a ribbon.ppt
 
Making business from recycled materials
Making business from recycled materialsMaking business from recycled materials
Making business from recycled materials
 
Arts and crafts
Arts and craftsArts and crafts
Arts and crafts
 
Fine Arts for the School Age - Programming for Libraries
Fine Arts for the School Age - Programming for LibrariesFine Arts for the School Age - Programming for Libraries
Fine Arts for the School Age - Programming for Libraries
 
Bob the bug
Bob the bugBob the bug
Bob the bug
 

Towel cake tutorial

  • 2.  A great gift idea:  Wedding  Bridal shower  Housewarming  Birthday  Etc  A great way to gift towels from a registry in a cute and exciting way!
  • 3.  4 bath towels  4 hand towels  4 washcloths  1 spool of ribbon 2”  1 spool of ribbon 1”  12-24 fake flowers  1 wooden dowel  1 pack of safety pins  3 large rubber bands  1 pack of sewing pins  Topper for the cake  Plastic base (I used a dollar tree circular platter… perfect!) Note: You can create a smaller version of the shower cake with 2 towels. I used 2 grey and 2 blue in each towel. All of my accessories were shades of purple.
  • 4. Prepare the bath towels by folding them in thirds and laying them on a flat surface. Lay two towels next to each other to create a long line. Overlap one towel over the other by 2”.
  • 5. Lay the second two towels over the first two. If you used different colors, make sure the same colors are on the same layer. Overlap these towels (same as the first layer).
  • 6. Roll the towels tightly from short end to short end. Secure with a rubber-band and some safety pins.
  • 7. Layer the hand towels just like the bath towels. If you used two different colors of towels, make sure the other color is on the outside layer this time. Roll & secure just like the bath towels.
  • 8. Layer the washcloths the same way as the other sets of towels, making sure the outside layer matches the color of the outside layer of the bath towels. Roll and secure.
  • 9. Stack the layers, with the biggest (bath towels) on the bottom and the smallest (washcloths) on the top. Secure with three or four safety pins.
  • 10. Insert a wooden dowel down the middle of the rolled towels and cut ½” below the tip of the cake so that it doesn’t poke out. This will support the cake. This is also a good time to put the cake on the plastic base.
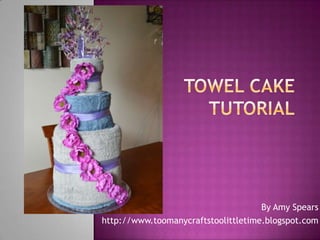
  • 11. Add the topper to the top of the cake. Mine was a crystal branch so I was able to just stick it in the cake. You may have to use safety pins or sewing pins. I also added a glass ‘L’ ornament later on for the first name of the recipient.
  • 12. Add ribbons around the center of each layer, covering the rubber band. You can put the larger ribbon the bottom and the smaller ribbon on top of it to create a more dynamic ribbon. Secure in the back with sewing or safety pins.
  • 13. Cut your fake flowers off the stems and secure in a cascading pattern down the cake. Secure using sewing pins. Make sure you warn the recipient about the pins in the towels!
  • 14. Do anything necessary to straighten ribbon, hide pins, and tuck in edges to make the cake as beautiful as possible!