DIY Plaster Doily Bowl (easy lace doilies project)
Wondering what to do with grandma’s doilies? Why not make a plaster doily bowl. It is a fun and easy craft project and these DIY bowls are so pretty and useful.
I have a little confession to make…
I am obsessed with pretty crochet doilies. Whenever I spot them in the thrift store or at a flea market I have to snatch them up.
I have a large collection of lace doilies now in all shapes and sizes and I love them all.
Which of course brings up the question: what to do with old doilies?

Well, today let me show you one of the ways I have used vintage crochet doilies in my home.
I turned my fabric doilies into pretty bowls with a fabric stiffener that gives them a sculpted look: plaster of Paris.
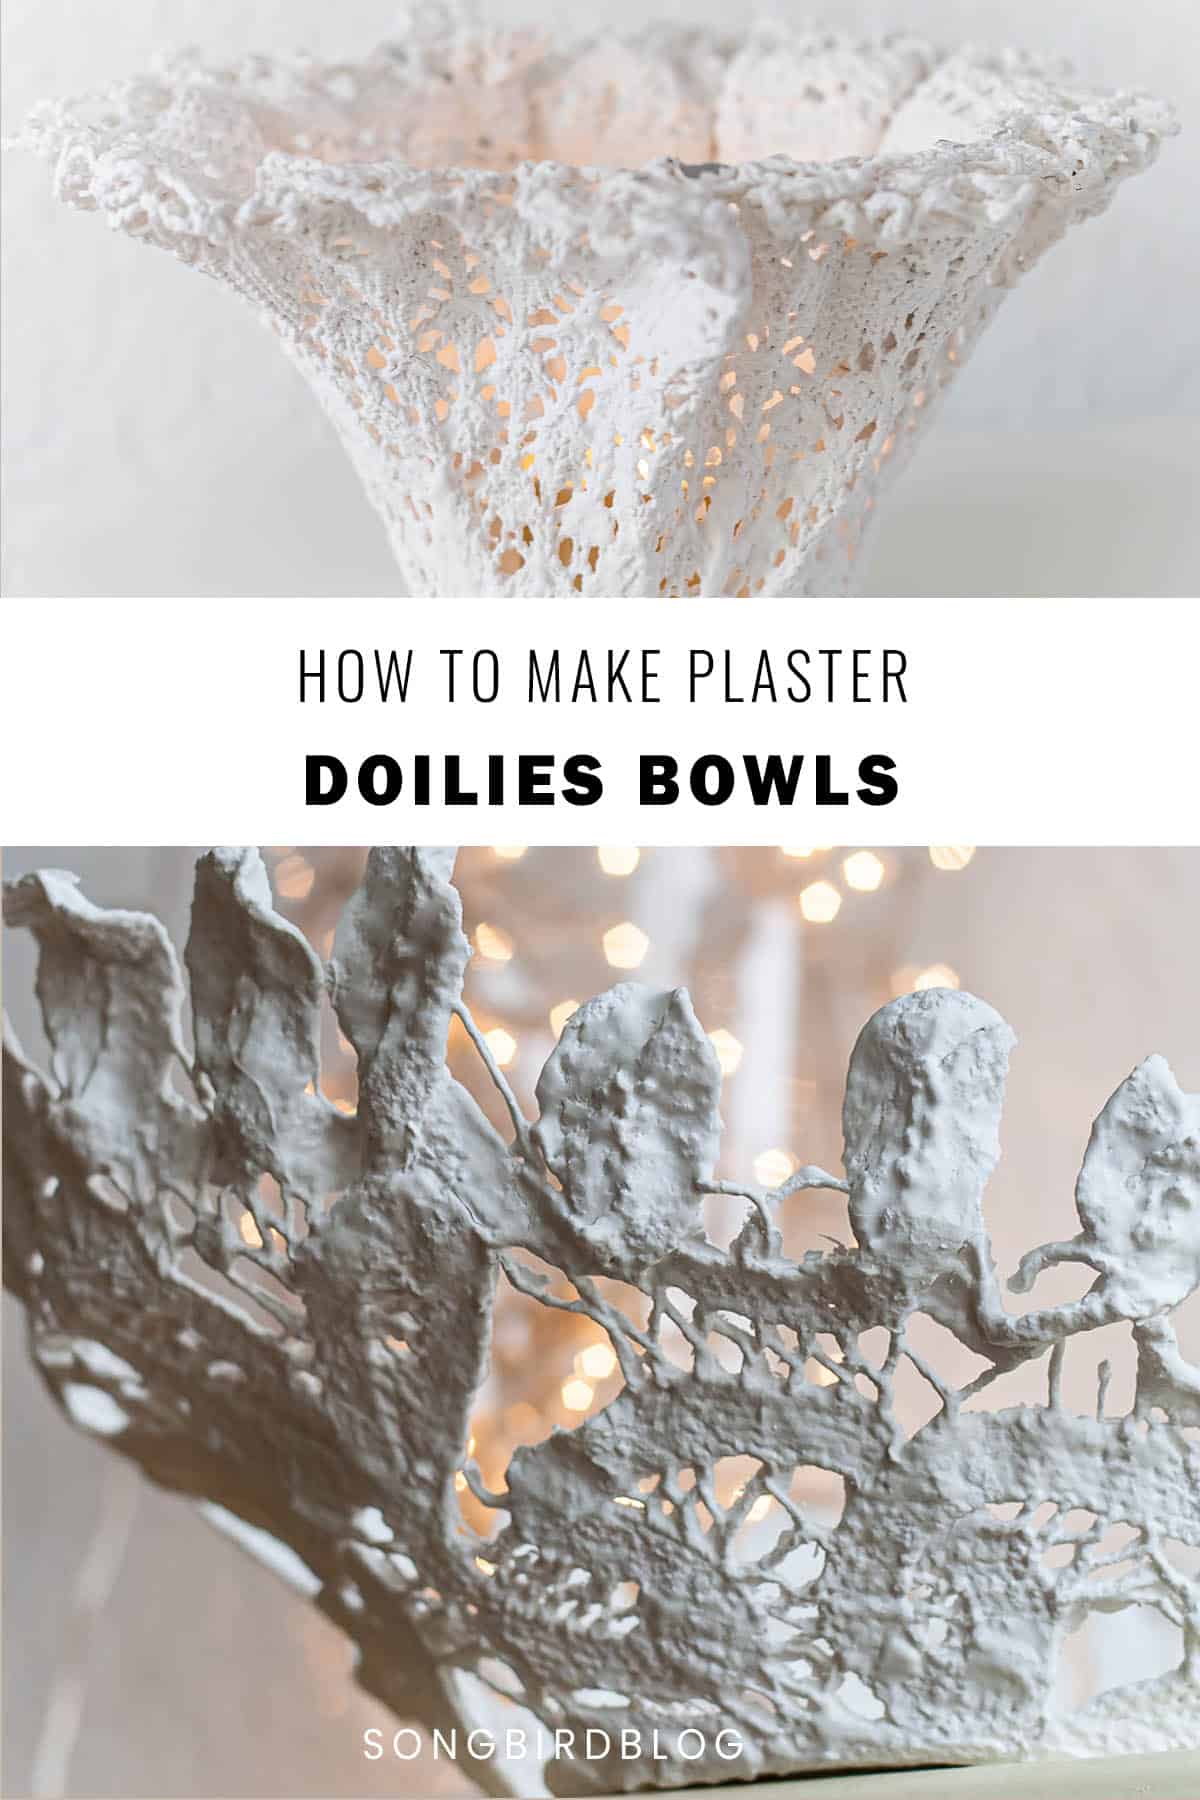
An old vintage crochet doily turned into a candle holder with some plaster. Don’t you think this looks lovely? It looks even better at night when you can see the candlelight shine through all the little holes.

How to Make a Plaster Doily Bowl
Want to make one too? Ok then, here is a tutorial about making plaster doily bowls for you.
Step 1. Find a nice (old) doily, to shape into a bowl
You can find doilies plentiful in thrift shops, at garage sales or flea markets, in craft stores, and sometimes at the dollar store. Of course, if you are good at crochet, then you can make your own doily too.
For my lace doily bowls, I choose a round doily and an oval doily. Both worked great, and both had their own magical outcome.

This doily had been stiffened before, but I just rinsed it in some water and it was fine to use.
Even if your doily is not stiff, still rinse it in some water to make the next steps easier.
Step 2 Find a mold to fit your doily
To make a plaster of Paris doily bowl you need a mold to drape your lace doily over. This is the step to do that. It is much easier to try out the proper form if your doily is only wet with water than when it has been dipped in plaster.

Try finding a bowl that is slightly smaller than your doily, so that your doily will fit over it comfortably.
Step 3 Mix up your plaster and dip your lace doily.
Add just enough water to your plaster of Paris to give it the consistency of yogurt rather than milk. The plaster should run off the back of a spoon slowly. If it runs off in a fast stream add a bit more plaster, if it clings to the spoon add a bit more water.
And then soak the doily.

See, actually right after I took this picture I added a little bit more water because the plaster was a bit too thick (it is easier and cheaper to add a little water when it is too thick than to add plaster to get it to thicken up).

When it is thoroughly soaked drape it over a form. I used a bowl from my mother’s Sunday china because I knew it would be fine.
If you are worried about your china then you could also first wrap it in saran wrap. This will protect your bowl and it might help get the plaster bowl loose from your mold.
As you can see I filled up the bottom with some extra plaster. My doily has a very open weave and I wanted it to have a proper bottom. If your doily has a more tight pattern you will not have to do this.

In the image above you can see that even more clearly.
This oval doily fit right over my bowl. For the little project I showed on top, the cup was smaller than the doily so I draped it with pleats.
Remember everywhere where the inside of your doily touches a surface it will probably dry up flat (the crochet texture will not be visible). So if you want the crochet look on the inside too, use as many pleats as you can or let your doily hang loose.
Step 4 Let your plaster of Paris dry
Now you need a little patience. You will have to wait for the moment when the plaster is dry enough to give the doily stability, but not so dry yet that you can’t wiggle it anymore. For this project that was about an hour of drying time in my living room.
Step 5 Remove your plaster of Paris bowl from its mold
When the plaster of Paris is dry to the touch but not completely set and hardened it’s the right time to remove your lace doily bowl from its mold. To pry it loose, you have to have a little patience.
First, start to loosen the edges of the doily from your form carefully. Then turn it around and wiggle with the form. You will panic here! Because it might seem as if you can’t get the doily bowl off the china, but just be patient, have faith in me, and keep fiddling with it carefully. Because at the exact moment when you think you will have to ruin your project or you will have to break your precious China, magically it will come loose.
At this time you can make some tiny adjustments (open up some holes that have filled up and remove some excess drippings) and when it feels right, put your DIY plaster of Paris bowl down and let it dry completely.
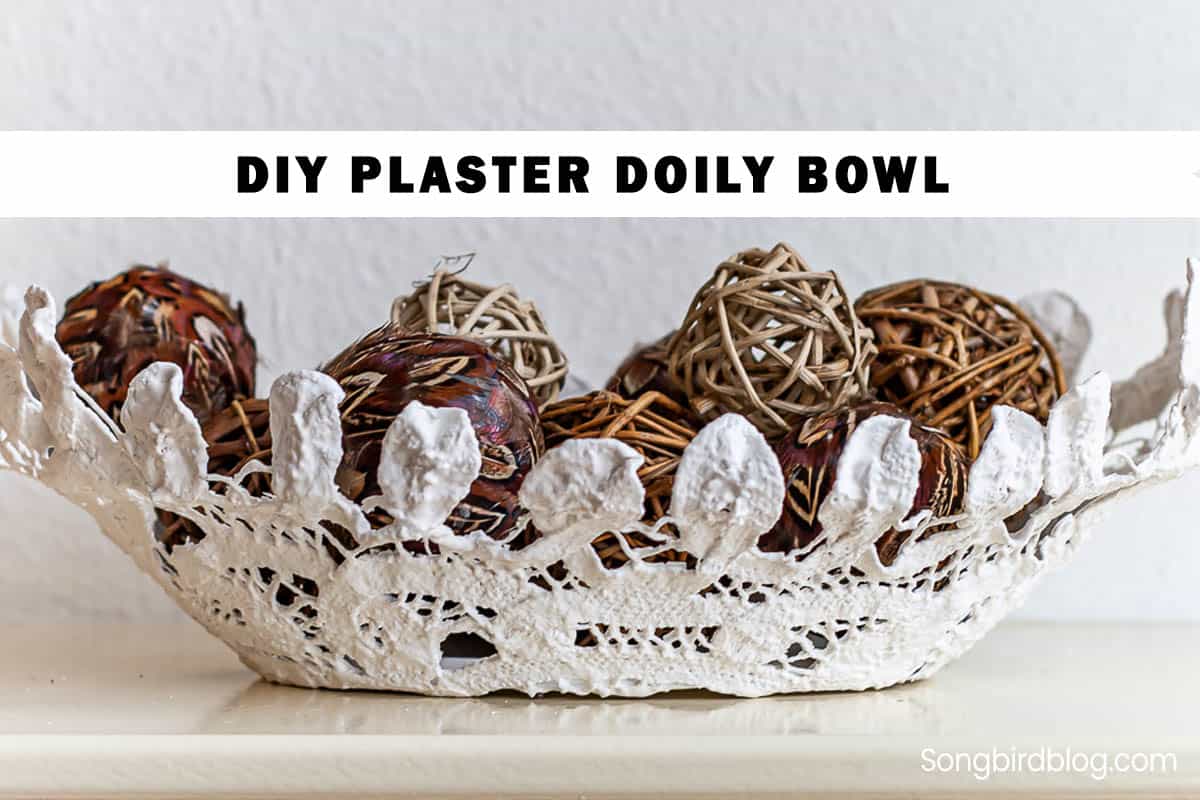
Step 6 Decorate with your lace doily bowl

And then you have a DIY bowl that you can fill up with anything you like. These plaster of Paris bowls are quite sturdy and are strong enough to hold anything. Use them to collect your keys, present sweets, turn them into a candle holder (like I did), or add some decorative elements like seashells, balls, ornaments, or flowers.
The plaster can shed a little. If you want to stop it from shedding a light coat of white spray paint will seal it nicely.
More fun things to do with plaster of Paris
If you have some plaster of Paris in your tub left then you might like this idea:

Make plaster of Paris cupcake candle holders.
I am really happy with how my lace doily bowl turned out. I love working with plaster of Paris it can give the most mundane thing a sculptured almost ceramic look.

More Fun Things To Do With Doilies
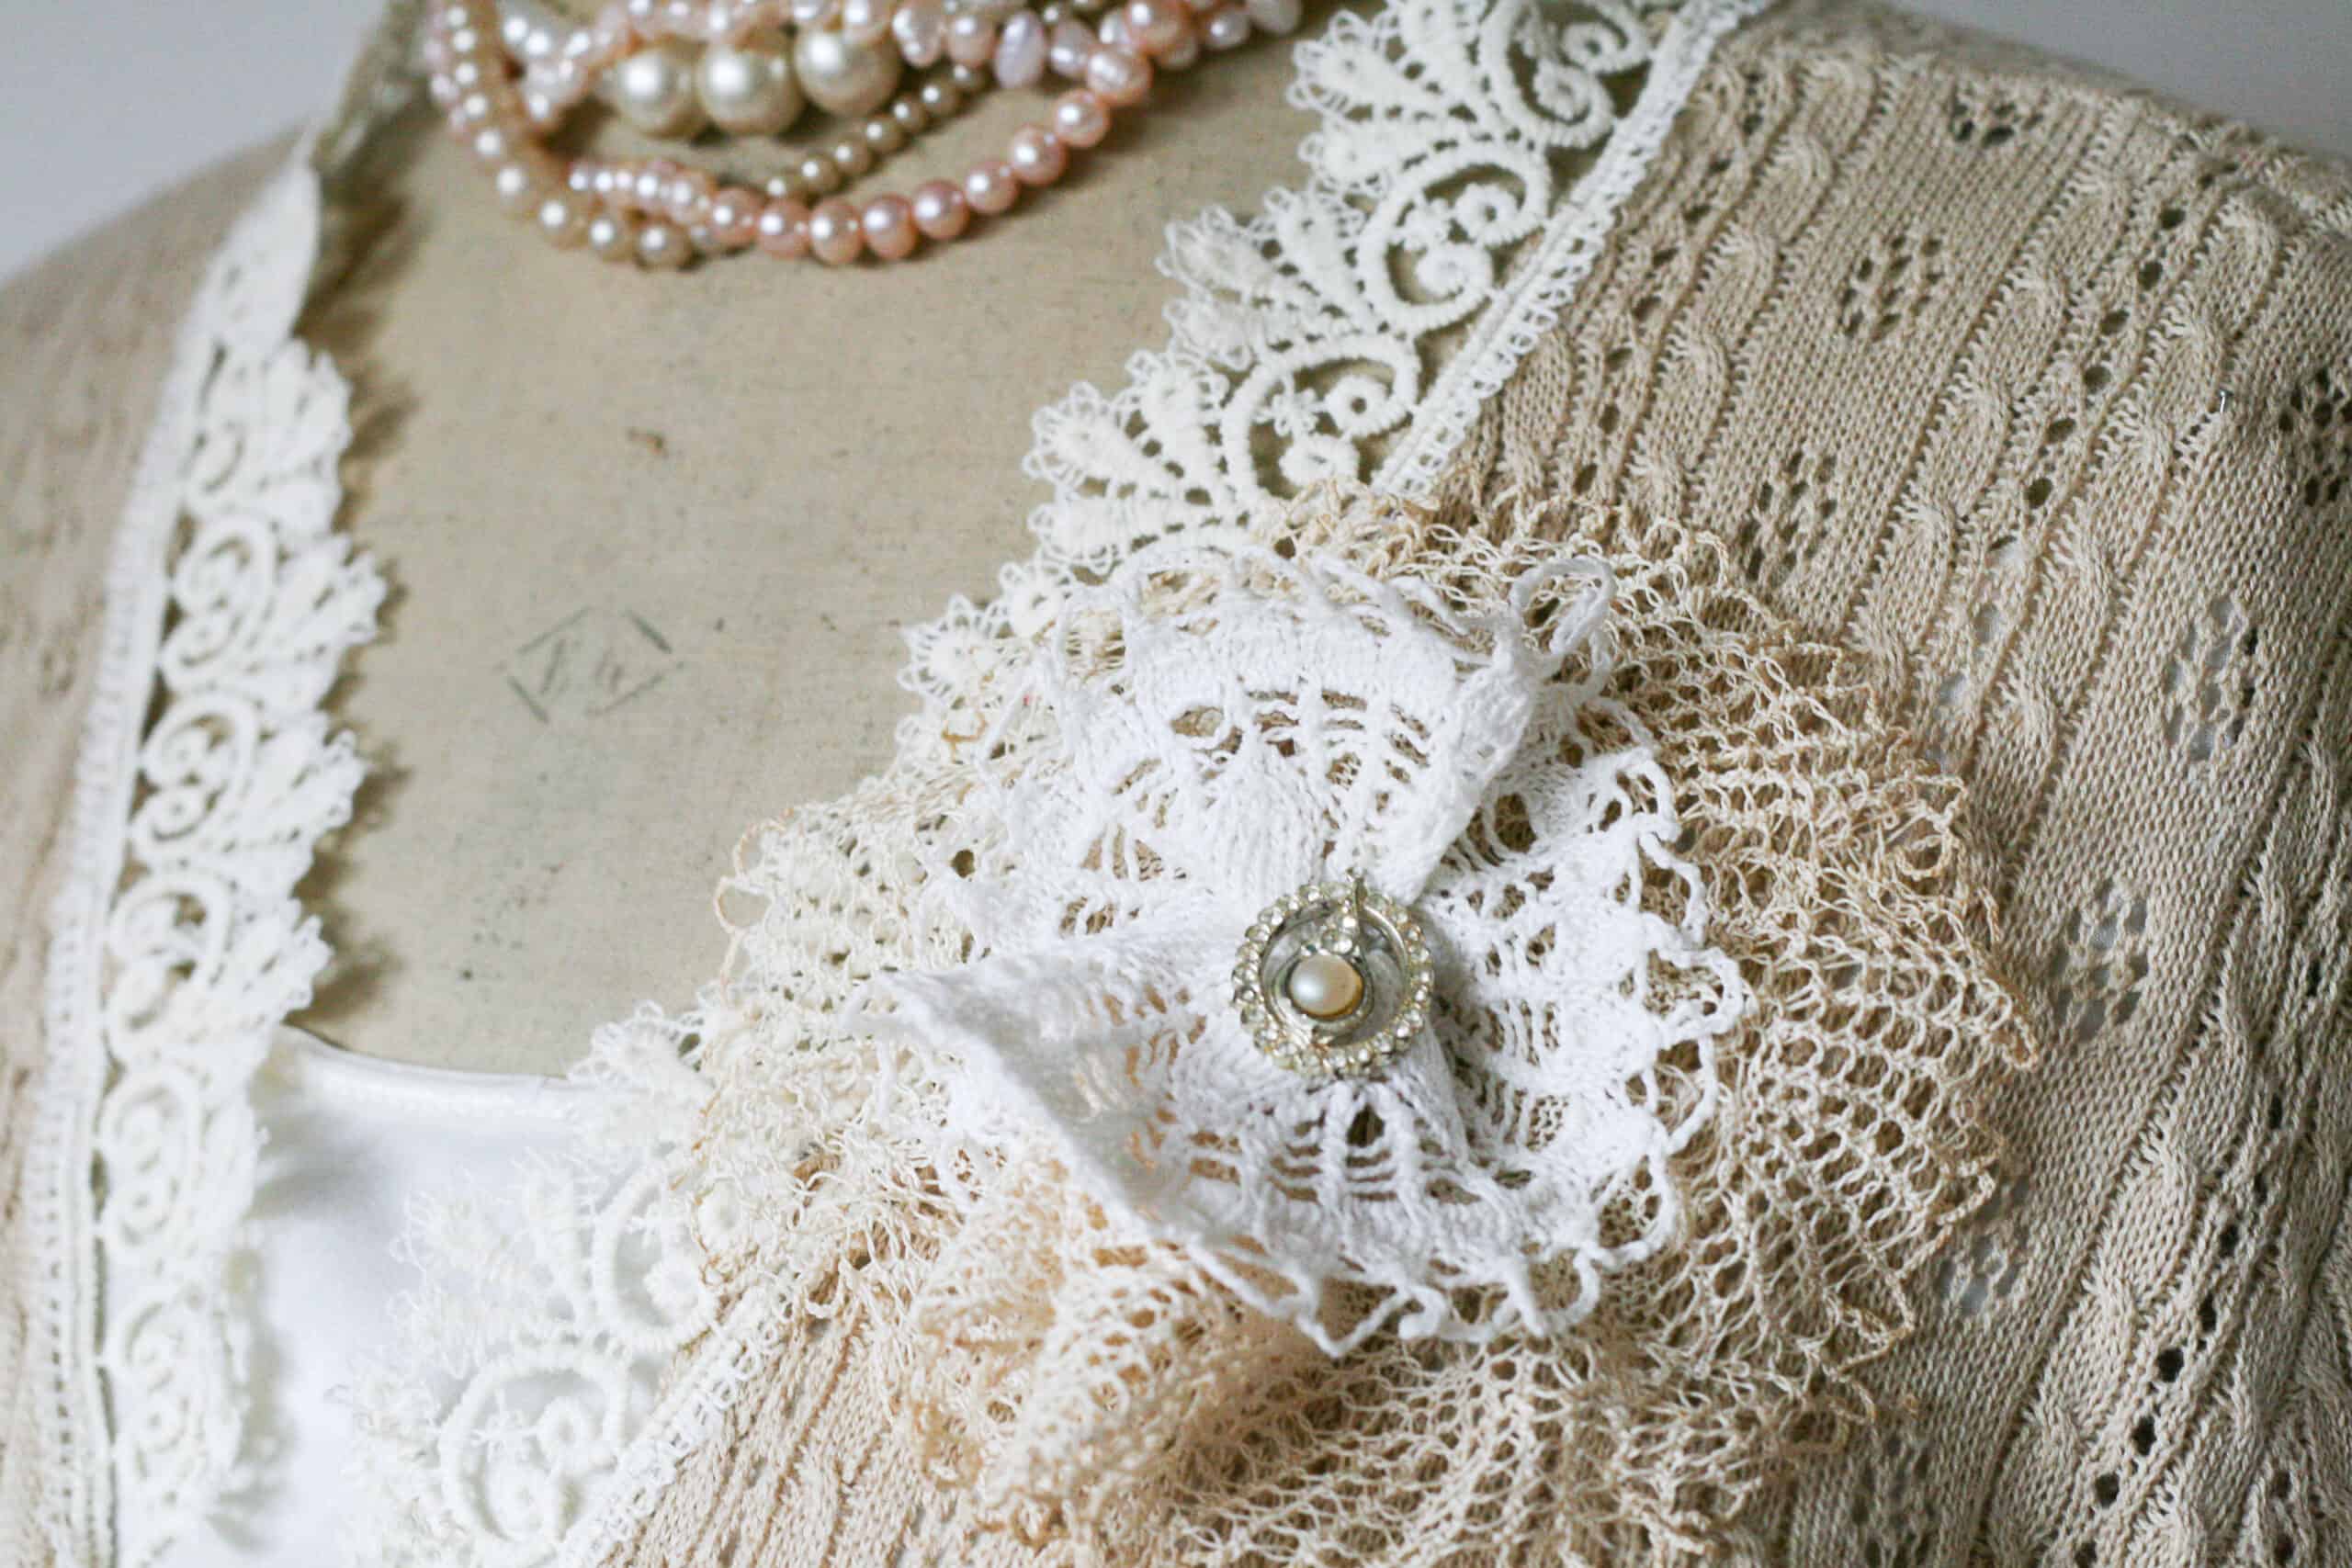
Upcycle a thrift store sweater into a cardigan an make a custom doily brooch.

Stiffen old doilies in sugar water and turn them into these Snowflake Doilies Ornaments.
I hope you liked all of our crochet projects.
If you will try and dip a doily or two in plaster yourself, be sure to tell me! Tag me on Instagram or Facebook and show me what you made so I can share it with everybody.
I would love to see your old doilies turned into lanterns and bowls.


Marianne Songbird is the founder of Songbird, where she hopes to inspire everyone to create a home they love, one DIY project at a time. She shares anything from craft ideas to home decor inspiration and from DIY projects to decorating hacks. Originally from the Netherlands Marianne and her husband Lex are currently renovating a 250-year-old farmhouse in Germany.
What a fantastic idea. I love it. Now I just have to find some old doilies. This is so clever and so pretty. Hugs, Marty
Marianne! Those doilies are beautiful! Thanks for sharing.
btw, If you would like for me to send you my next pottery barn catalogue in the mail for you to peruse, I'd be happy to. Just let me know.
gail
that's real smart, maybe i gonna make one myself. but i think i need to make a doilie first.
nynke
What a great idea Marianne – I love it.
They both look so beautiful in your displayes.
~ Tina
that is awesome! I love the candle inside! so pretty! thanks for sharing.
xo natalea
What a great idea. I love the look.
Still looking for the plaster. I need to get to a bigger town.
This is brilliant, Marianne. I love it. I don't know if I have the patience for it but I applaud you. It does look pretty with the candle glowing inside!
xoxo
Jane
Dat wil ik ook altijd nog eens doen, maar het komt er maar niet van. Een lapje in de stijfsel en moet je zien hoe leuk dat wordt. Mooie foto`s vooral die met dat licht erbij, heel mooi!
Groetjes,
Jeanette
Wat mooi zeg! Jij bent ook zo slim! mooie tutorial.
Marianne, that is SO cute…SO clever…and makes such a pretty little statement…i love it!!!
That is so darn darling!
smiles, alice
Very pretty! And I'm thinking that if you cover your form with plastic wrap first you won't have to worry about breaking it. Seems like we used to do that with styrofoam forms.
Hi Marianne, this is fabulous!
What a wonderful idea! This is a perfect way to transform those little doilies I never use because they have the wrong size. They would be perfect for small candle holders. Thanks for sharing this great tip. Have a wonderful week! /linnea-maria
those are so fun!
I KNEW IT COULD BE DONE!! Thank-you for proving it to me. I've had that idea in my crazy mixed up head for some time. But never tried it. I've seen the porcelian stuff on the market to do flowers. And always wondered if you could do doily's with it. And you have shown me that good old plaster could do it.
Your work is beautiful!!
What a great idea! I love this! Thanks for the directions!
I've been working on this same kind of project! I've only used round ones but the battenburg lace looks awesome! Beautiful job!
Mooi!
Oooooooooooh – I like these. I've done something similar using Mod Podge to stiffen doilies but this looks fun and definitely gives them a different look…
What a fantastic idea that is, I love it!
What a brilliant idea! They are so beautiful!
What a fantastic and practical way of showing off doilies which are otherwise hidden away in drawers. You are so inventive to come up with that. Great!
Thanks for commenting on my Easter decorations 😉
They add an unexpected feminine touch! So creative!!
Those are gorgeous – you sure know how to make the best of plaster.
Thanks for sharing it and always finding time to stop by my blog.
tammy
Oh I love this idea! I have a few old doilies that have gotten stained from spills and candles, I see a new life for them in sight. Thank you, Thank you, thank you for this great use for them.
Rose
Very lovely!!
That is the coolest thing I have ever seen!
I would love for you to link up to check me out saturdays over at my blog
I wonder if you can add food coloring to the mix. Could open up a whole new range of decorative styling.
Amazing!! My sis did this with starch years and years ago, but I'd never have thought of using plaster. Way cool!
i have two vintage doilies sitting in storage, made by great grandmother. now i have a project for them. thank you!
Oh my gosh!!!! This is another lovely project! (I am personally crowning you the Queen of Plaster!!!) Must try this!!!
This is amazing! love it! coming over from todays creative blog!
Marianne,
I featured your potter barn number planters on my Frugalicious Friday favorites post! Thanks for linkin' up…I love your doilies!!
I can't believe one person can be so creative and talented!
I can't wait to try these!
Warmly,
Sandy
great Idea!
This is such a cool idea. I love it.
Thanks for sharing! I want to try this with some doilies my grandma made.
Stopping by from Today's Creative! Just signed up to follow you. Stop by my scrapbooking blog when you get a chance always looking for a few more crafty followers!
I love this.
SUPER cool!!! I will be trying this soon.thks for sharing.
now that is really great. I'm going to have to keep plaster in mind as a medium
so pretty! I can't wait to try this!! thanks!
Marianne – you never cease to amaze and delight! I'm posting about this on my blog!
You certainly are into white these days – and I adore what you are doing with it.
Absolutely gorgeous, thanks for the tutorial….
Great project! How about spraying the item you use as a form with non-stick cooking spray, or rubbing just a little oil on it to prevent sticking?
Berit
I absolutely love these and the roses! I can see I am going to be visiting for a long time, because I am so fascinated! (By the way, is the "plaster", plaster of paris?
In the meanwhile, I think I will make some more coffee and continue for a while.
Thank you so much, Karen
I love your project I have been looking for doilies for months in Charity shops etc can't find any any where :0( but when I do i may well give this a go!
Love Dawn xx
Hello,
This is my first visit.
These are so pretty and the skies the limit…now I do have a question..How easily does the plaster come off of the mold you've used? Does it wash off with warm water?
Drop by when you have a moment..
Hugs,
Stephanie ♥
Great idea, it remembers me on what my mum and grandmother did in earlier years. They did the same with very strong sugarwater and got the same results even a bit more in the details, because you can't see any plaster.
Thanks for showing it, so good old feelings come up again 😉
Kind regards,
Marij
Oh my goodness….how clever is that? I have a hunch you'll be seeing them all over bloggville now!
Not sure what kind of plaster to use? Is that just plain old plaster of paris?
Can't wait to try this..
Hugs,
Spencer
That is gorgeous!
Marianne. OMG those are beautiful. I love the candle one. What a simple idea.
How creative is that! Adorable!!
Love it! Great idea and the white would be great in my dining room. Now, I just have to search out a doily!
Omygoodness…how clever you are! I love the doilies and plaster!
Jana
Yep. This did it. You're officially going into my blog roll. Very creative!
Hugs,
Jami
This is such a cool creative idea. I can't wait to start dipping some things! I love pinecones and would love to see how that turns out. I really want to try coloring the plaster as well! Thanks for the inspiration.
I'm going to use this idea for centerpieces for my daughter's "Vintage Hollywood" themed wedding! …with the plaster roses too! Thanks for the inspiring ideas 🙂
…hmmmm, do you think the plaster would take some spray paint?
I just picked up some old doilies at the antique mall…HAVE to try this!!
Beautiful! Thank you for sharing. ~Have a wonderful day and keep yourself crafty~
This is fantastic!!
Love it!!
How pretty is that?!!!
Thanks so much for the tutorial!!
Deborah xo
I am off to a second hand shop tomorrow to look for old doilies. Thanks for sharing! I might even try this with some colourful scarves!
Thank you! I can't wait to try this! And I just happen to have a new carton of plaster in my studio! Yay!
Sheila
Finally! Thank you for this terrific idea! I have quite a few family heirloom doilies and now I finally know what to do with them! You are a genious!!!
Wow, a genius, I haven’t had that compliment much. Good luck and have fun playing with plaster and doilies.
This is so pretty and I have boxes of plaster just waiting for a craft like this! Thanks for the inspiration Marianne!
Really pretty project. I have never worked with plaster of Paris before, how strong is the surface once it’s sets and does it chip. You have given me so many ideas with this project.
This is gorgeous. I always tend to over estimate the amount of plaster I’ll need for a project and I hate having it go to waste.
Nice to have you join our group this month Marianne. Your crochet doily bowls are so pretty! I would never have thought to use plaster of Paris as a hardener. I definitely want to try this idea sometime as I have a tub of doilies in a bin somewhere. I love your crochet candle holder idea!
I’ve been watching your YouTube videos about the old farm renovation and I’m loving it!
You two are quite a team!
Congrats
PS: You two must be so tired…..