
Lavender, hydrangea Incrediball, hydrangea paniculata in mid-July
Hi there! What a summer we’ve had! The weather didn’t always cooperate, but we managed to get out, get moving and have fun just the same. I sit here now, looking back on all of the pictures I’ve taken and the summer seems to have passed in a blur! I vaguely remember making some lavender wands during a short window of opportunity, and noting that I wanted to blog about making them, but then moving on to a million other ‘summer’ things. So here I am writing the blog post for you to use *next* summer! 🙂

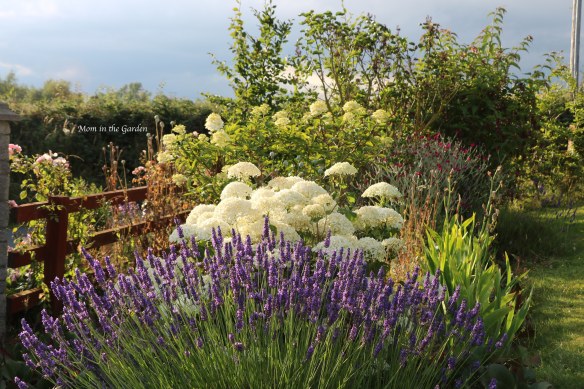
My main lavender bed with mature plants in mid July, amongst hydrangea, lilies, a vase of daisies and some annual plants. The tall yellow plants in the background are fennel plants.
First things first: What is a lavender wand? A lavender wand is a whimsical way to preserve the lovely smell of the lavender flower. A quick description of how to do that would be to bend the stems of the lavender over the flower head and weave a ribbon around the stems! I’ll give more detailed instructions below. But first we need some lavender. The lavender I grow is ‘Lavandula angustifolia’ (English lavender). I have found that it is perfect for making wands, wreaths, and drying for sachets. It also looks really nice in the garden. It is easy to grow, too. I have plants that get only morning sun, and I have plants that get full sun. They are all happy, and don’t require extra watering. The plants spread and grow bigger over time. The 10 year old plant in the picture above is more than 3 feet across.
There is a one to two week window to make lavender wands, which is the time when the individual blooms just start to open. This time is best because the stems are still pliable, which is necessary in order to bend them without breaking them. As the summer goes on, the stems get more stiff and will break when bent. The established plant will have new stems (referring to the green part) every year which are quite thin with a smaller flower head, while ‘returning’ older stems will be thicker and longer, and the flower heads will also be much longer than newer ones. The thicker stems are the ones you want to use, to have ‘full’ wands.

Wider ribbon is easier to use, and helps the weaving to go much faster! I prefer 3/8 inch (9 mm). 60 inches (152 mm) of ribbon will cover one wand.

Tie a ribbon at the base of the flowers (not too tight or you’ll break the stems).
I use 25 stems for my wands to keep them nice and thick, and because inevitably, a stem or two will break, and starting with 25, the wand will still be full looking. I tend to cut my lavender long, cutting 2/3 of the stem, and then after grouping the 25 stems together, I will cut them to a shorter, more manageable length. Clear the length of the stems, taking off any green leaves or tiny side-blooms. The odd number is necessary to properly weave the ribbon through the stems. Sometimes the last group will have three stems, but this really doesn’t matter. After I’ve gathered the 25 stems and lined-up all of the flower heads, I tie the ribbon around the stems and make a knot just at the base of the flower heads. Using wider ribbon is easier to weave with – I prefer 3/8 inch (9 mm). Approximately 60 inches of ribbon (152 mm) will cover one wand.

After knotting the ribbon around the base of the flower heads, carefully fold the stems over the flowers
The next part is probably the trickiest: while holding the 25 stems in your hand, carefully bend the stems over the flower heads, keeping them tidy for the next step of weaving the ribbon. The next step is simple weaving: I group the stems in twos, just to make it easier. Weave the ribbon over and under each group of two stems, pulling tightly after each one, but not too tightly as to break a stem, or to bunch up the ribbon. 
A (slightly blurry) top view of a lavender wand being made.

Here’s a top view of the lavender wands after they have fully dried, in late August

Weave the ribbon around two stems at a time, covering the lavender flowers.

Can you see the inch worm on the green stem just under the ‘Mom in the Garden’ tag?
I prefer my wands to be nice and full. That means there will be a lot of flowers to cover! It helps to evenly space out the stems. You might still have some stray flowers poking out after you are finished. I think those are nice to see, especially when trying to explain to someone what exactly a ‘Lavender Wand’ is! 🙂

I’m just having fun with this picture. Still a bit more to go!
It’s good to keep the ribbon nice and tight, because as the lavender flowers dry, they shrink in size. A tightly wound ribbon will ensure a neat and tidy wand even after it dries. Weave until just past the bottom of the flower head. I like to have ribbon on the handle, too, and I found a website with pictures of the neatest way to cover the lavender handles. The site is called ‘How’s Robb’ blog. The thing is, they didn’t explain how to make the knots! But it really is simple, and I posted photos of the process here. You make a knot, turn the ribbon in the opposite direction, wrapping it round the stems and make another knot under the previous knot, all the way down the stem. I also did a video tutorial here. Sometimes I like watching videos to learn something new, sometimes I want pictures, and sometimes I want text. So now I have it all covered!

Completed lavender wands

Some brightly colored ribbon really makes the wands stand out!
At this stage, I’ve used just about every color and style of ribbon on my wands. My favorite type is a shiny ribbon, 3/8 inch, and bright colors. Lighter colored ribbons tend to stain green from the stems, which isn’t ideal. I think this year I liked the plum color best.

I like using all different color ribbons, but the purple shades are probably my favorite!
Lavender wands are just fun to have, and even more fun to give away as gifts. Honestly, mine last for years. To enjoy their scent, I just place the flower head part of the wand between both of my hands and rub back and forth a few times! You could bang it against something, too, but that might break the handle 🙂

This scarf, from a friend in Japan, was a perfect backdrop to use for taking pictures of the wands!

The stems change color as they dry. This picture was taken at the end of August of these wands which were made in mid-July.
So next year, just when the lavender flowers start to bloom, I will repost this post so we can all make beautiful lavender wands!
Here’s to getting things done, even if a little late. 🙂
In peace,
Dana


Pingback: The time for playing with lavender is now! | Mom in the Garden
Thank you for such a detailed and well described tutorial. Your tip of when to harvest the lavender and the variety will be useful for next year. I have made them over the years and have always had trouble with stems breaking.
Cheers
Annie
Hi Annie, you’re very welcome! I hope you get to make loads of wands this year! 🙂
Bellissimo 💖😍
Thank you so much, Luciana! 🙂
Pingback: When your lavender is ready but you are not | Mom in the Garden
I remember making one of these with my grandmother and I kept it for years, but when I tried to make them again the stems kept breaking. So thank you for your instructions and I’ll try next year, and make some with my grandchildren.
It’s important to not wait too long in the season to make them as then the stems are more brittle. Also, don’t let them sit for too long after cutting them as they’ll dry out. I hope you’ll have fun making them next year! And thank you so much for your kind comment. 🙂