Tired of
lengthy page building?
Try GemPages to create pages faster and smarter with AI-powered feature.
Try GemPages to create pages faster and smarter with AI-powered feature.
Exclusively for users making any first payment from Oct 1st to Dec 31st 2023, UTC.
Discount applied automatically at checkout.
Thank you for subscribing.
You will be the first to know about new releases, giveaways, special projects, and everything we promised.
Your email is already used.
Looks like you already signed up for GemAcademy Premium using this email address.
Stay in the know
Subscribe and you'll be the first to know about Shopify news, profitable store ideas, helpful guides, product updates, and more.
People tend to keep dozens of browser tabs open when searching for something, in that case, the small icon on the left side of the website’s title is a strong helping hand to let them identify pages they’ve visited.
That small thing is called a favicon, a small square image playing a big role in reinforcing brand identity.
If you are an entrepreneur looking to add or change a favicon on your Shopify store, you are at the right place. In this blog post, we will walk you through 8 easy steps to add or change a favicon on Shopify.
A favicon, short for favorite icon, is a small icon that appears in the browser tab or bookmark bar next to the website's title. The favicon image typically duplicates or partly repeats the brand’s logo icon, assisting in boosting brand recognition.

Favicons are small square images displayed in the tab of a browser web or bookmark bar next to the website’s title.
The ideal favicon size on Shopify is 16x16 or 32x32 pixels. Small as it may seem, a favicon can do wonders for your online store:
Learn more: 12 Brand Building Tips Shopify Store Owners Need to Know
First things first, go to Shopify website and log in to your Shopify account using your email address and password.
Learn more: Shopify Tutorial: Set Up Your Store from Scratch to Finish (2023)

On Shopify, a favicon is included in all themes as a straightforward option.
So, from your Shopify admin, head over to Online Store > Themes.

Once you’re in the Themes section, hit the Customize button.

Next, click on the icon referring to Theme Settings.

Depending on your current theme, the Favicon section will be displayed differently. Here is our tutorial on the Dawn theme.
In the Theme settings page, click Logo.
![]()
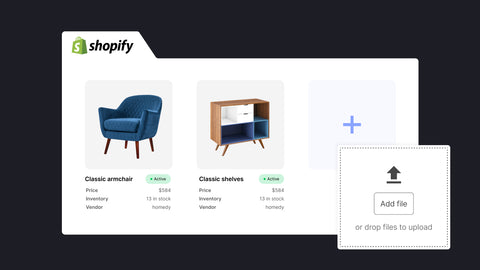
On the Logo section, you can add or change either your logo or your favicon.
In the Favicon image area, do one of the following:

Here, you can also change a selected favicon by clicking on the Change button.

Once a favicon is chosen, add alt text to describe your image. Alt text will be displayed when an image can’t load.
Learn more: How to Write Shopify Product Descriptions That Inspire Purchase

Remember to click Save to save your changes.

Now the selected favicon is displayed on your browser tab next to your website’s title.

Whether you are starting out with Shopify or are a seasoned eCommerce expert, having a well-designed favicon on your Shopify store brings you one step closer to creating a strong and professional brand identity.
But don’t stop there and settle for a run-of-the-mill online store when you can take your business to a higher level with GemPages, our powerful and user-friendly page builder.
Let GemPages be your right-hand person to elevate your storefront and build pages that actually sell in no time.


© 2017-2024 GemPages. All Rights Reserved.
![Post-Purchase Surveys: Guide, Examples, and Questions [2024]](http://gempages.net/cdn/shop/articles/Post_Purchase_Survey_480x480.webp?v=1713760779)