Introduction to Geometric Dimensioning and Tolerancing
Previous Chapter | Training Home | Next Chapter |
GD&T is a symbolic language. It is used to specify the size, shape, form, orientation, and location of features on a part. And its basically a design tool. To apply GD&T properly one must have a good understanding of parts functional requirement in an assembly. Let us start learn the language of symbols.

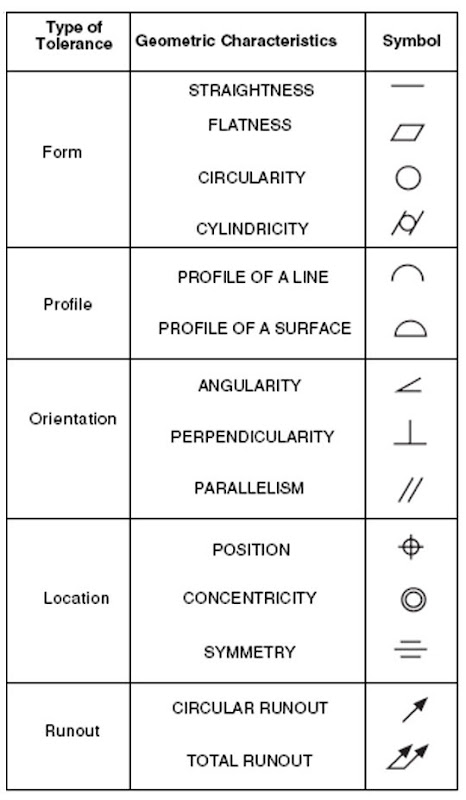
There are fourteen geometric characteristic symbols used in the language of GD&T. They are divided in to five categories namely form, orientation, location, runout, and profile.
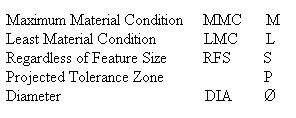
In addition to above symbols there are five more modifying symbols used in GD&T.

We will discuss each of these symbols in detail on future chapters.
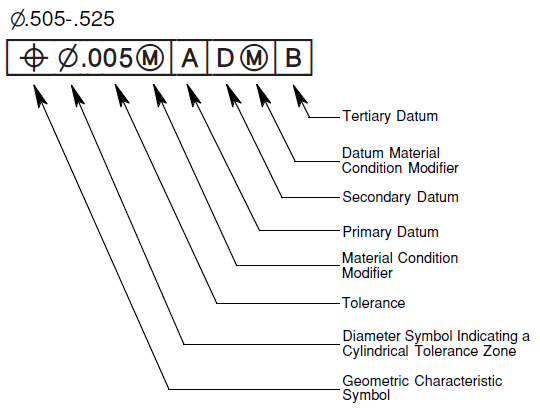
Let us now familiarize the feature control frame

Geometric dimensioning and tolerancing is applied on a drawing via these feature control frames. It’s a rectangle which is divided into compartments within which geometric characteristic symbol, tolerance value, modifiers, and datum references are placed. These feature control frames may attached below dimensions or to a datum reference or to a feature with a leader.
Let us now familiarize some of the common terms used in GD&T.
Basic Dimension
A basic dimension is a numerical value used to describe the theoretically exact size, profile, orientation, or location of a feature or datum target. Basic dimensions are used to define or position tolerance zones.
Datum
A datum is a theoretically exact point, line, or plane derived from the true geometric counterpart of a specified datum feature. A datum is the origin from which the location or geometric characteristics of features of a part are established.
Datum feature
A datum feature is an actual feature on a part used to establish a datum.
Feature
A feature is a physical portion of a part like hole, flat surface, ribs etc.
Feature of Size
A feature with size dimension, hole with diameter dimension is an example of feature of size.
Least Material Condition (LMC)
The least material condition of a feature of size is the least amount of material within the stated limits of size. For example, the minimum shaft diameter or the maximum hole diameter.
Maximum material condition (MMC)
The maximum material condition of a feature of size is the maximum amount of material within the stated limits of size, for example, the maximum shaft diameter or the minimum hole diameter.
True position
True position is the theoretically exact location of a feature established by basic dimensions. Tolerance zones are located at true position.
Virtual condition
The virtual condition of a feature specified at MMC is a constant boundary generated by the collective effects of the MMC limit of size of a feature and the specified geometric tolerance. Features specified with an LMC modifier also have a virtual condition.
Now let us learn about the basic rules in GD&T on the next chapter.
Previous Chapter | Training Home | Next Chapter |
Labels: ASME, Engineering Standards and Codes, feature, GDT, Machine Design, Training


